An Holographic projection is used at La Maison du Marais museum, a nice way to offer a realistic and immersive scenery.
Based on Linutop kiosk digital signage solution allowing automated display of HD video, Photos, pdf or WebPages.
Affordable and quick to setup, this installation uses a Linutop XS and Raspberry Pi with Linutop OS.
|

Holographic video at la Maison du Marais |
April 19th, 2018 - Posted in #raspberry pi, Case Studies, Digital Signage, English, Linutop, Software | No Comments »
|
Maintenant disponible sur PC et Raspberry Pi
Linutop OS XS affiche des vidéo Full HD 1080p !
Idéal pour des utilisations professionnelles:
- l’accélération vidéo offre une fluidité inégalée des mp4
- Cette option est désormais disponible dans la dernière version du Kiosk Player pour raspberry Pi
- Il permet un démarrage automatique de la vidéo et de programmer l’extinction de l’écran.
Configurez votre player en quelques clics.
Essayez-le dès maintenant !
 
|

|
February 15th, 2018 - Tags: #digital_signage, #raspberry pi
Posted in #raspberry pi, Affichage Dynamique, French, Software | No Comments »
|
Now available on PC and Raspberry Pi.
Linutop OS can play Full HD 1080p videos!
Ideal for a Professional use:
- Video acceleration for a smooth mp4 video playback
- This option is now available in the last version of Linutop Kiosk player for Raspberry Pi
- Allowing automated video start and screen screen shutdown programmation.
Set up your player in few clicks,
Try it now !
 
|

|
February 15th, 2018 - Posted in #raspberry pi, Digital Signage, English, Software | No Comments »
|
Now available for PC and Raspberry Pi.
Linutop OS is designed with ‘XFCE’ classic graphical environment and Linux, providing the best security.
Ideal for a Professional use
-Digital signage (web page, video, image, pdf…)
-Internet Kiosk (for public secure access)
Select and configure your system in just a few clicks.
Try it now
 
|

|
August 18th, 2017 - Tags: #raspberry pi, digital signage, Internet kiosk, Linux, pc
Posted in Digital Signage, English, Linutop, Linutop OS, Software | No Comments »
|
Linutop OS XS can convert any Raspberry Pi into a secured Internet access point or Digital Signage system.
Noobs (New Out Of Box Software) allows an installation with a simple file copy on a micro SD Card.
Noobs is the easiest and fastest way to install an Operating System on a Raspberry Pi.
Benefits
- ready to use and Quick to configure
- Hardware acceleration for VLC
- Security and Privacy
- Maintenance Cost
- Boot Time < 30 seconds
Software for Digital Signage enables to Broadcast different media in full screen: image, PDF, URL link, web page, HD video and music, from a file, the Network or Linutop.tv (Cloud).
Kiosk designed to configure a sucured Internet access point in few clicks: with or without toolbar, with or without white/black list of websites.
Compatibility Raspberry Pi Zero, A, B, B+, 2 and 3 .
 
|
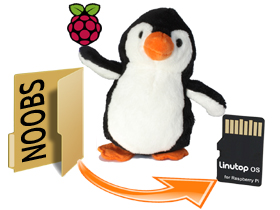
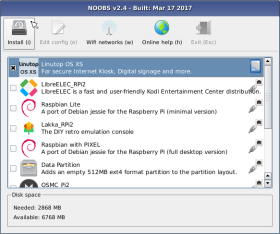
Noobs Installation Screen
|
May 30th, 2017 - Posted in #raspberry pi, English, Linutop, Software | No Comments »
|
Linutop OS XS permet de convertir tous les Raspberry Pi en borne d’accès Internet sécurisée ou en système d’affichage dynamique.
Noobs (New Out Of Box Software) permet une installation du système par une simple copie de fichiers sur une carte mémoire SD.
Noobs est la façon la plus simple et rapide d’installer un système d’exploitation sur Raspberry Pi.
Avantages
- Prêt à l’emploi
- Accélérateur graphique pour VLC (Lecture HD)
- Sécurité et Confidentialité
- Coût de maintenance
- Temps de démarrage < 30 secondes
Logiciel pour Affichage Dynamique permet de diffuser différents médias en plein écran: image, PDF, lien URL, page web, vidéo HD et musique, à partir d’un dossier ou du réseau. Aussi compatible avec le système de diffusion Linutop.TV (Cloud).
Kiosque permet de sécuriser un point d’accès internet en quelques cliques, avec ou sans barre de navigation, ou restriction(s) de site(s) pour la navigation Internet.
Compatibilité Raspberry Pi Zero, A, B, B+, 2 et 3 .
 
|


Ecran d’installation du Noobs
|
May 30th, 2017 - Posted in #raspberry pi, French, Linutop, Software | No Comments »

We’re happy to announce Linutop.TV : a new Online Digital Signage Service
This service enables to build playlists from various Media files (photos, videos, WebPages …) and broadcast them remotely on a screens network.
Linutop.TV is Digital Signage Solution, energy-efficient, quick to setup and affordable.
Linutop.TV Sevice’s Benefits:
- - Affordable: Economic model with no time commitment starting at starting at 20€/month per screen. Energy efficient solution.
- - Online editing made simple: Accessible from any web browser (no software installation needed).
- - Automated broadcast:c 24/24, 7/7 ability to display offline, with low bandwidth use.
- - Security: Remote secured management of screens networks.
- - Compatibility: Linutop Computers or PC with Linutop OS.
Linutop.TV Service is available now: http://www.linutop.tv
Service available from 20€/month per screen
June 6th, 2012 - Posted in Digital Signage, Linutop, Linutop OS, Small PC, Software | No Comments »
 Paris, 26 Juin 2012, 11.00pm Sodexi (Society of International Express Development), from its headquarters hub at Paris CDG airport is specialised in express transport operations. Sodexi is a subsidiary of Air France – KLM .
Linutop is one of the solution, choosen by Sodexi, to carry out the parcels sorting. With Linutop 2 and Linutop 4, Linutop has many advantages on the production line :
- energy efficient : money saver for 24h / day use.
- maintenance free : thanks its configuration lock system.
- a very small size : small is beautiful !
- easy to set up : save some time in setting it up Linutop is in this case, an ideal technologie.
March 6th, 2012 - Posted in Case Studies, Digital Signage, English, Linutop, Small PC, Software | No Comments »

Linutop announced today the latest version of its operating system 4.0
This version, based on an lightweight and optimized version of Ubuntu 10.04 LTS (Gnome is now replacing Xfce) includes the new Linutop’s kiosk software, which simplifies the set up of a secured internet kiosk or digital display.
It also support most of the PCs: Now wake up your old PC with a Linutop OS 4.0 USB key !
Linutop OS 4.0 Main features:
- Linutop Lock Security The system can be locked into read only mode, preventing alterations by viruses or other mishaps. Its ability to recover its initial state at each startup also minimizes maintenance costs.
- Internet Kiosk Allows professionals (internet cafes, hotels…) to configure their homepages in full screen with toolbar or not, to block certain websites or to lock designated websites.
- Display Kiosk Allows professionals to easily (with drag n drop) configure playlist including time and order and support JPEG, URLs, folders and video files.
Key Benefits of the Linutop OS 4.0 are:
- Compatibility - Compatible with i386 PCs hardware.
- Security - full lock up of the system by password
- Small - Only 700Mo with all configured software and languages.
- Energy efficiency - Designed for minimal processing power.
- USB Back-up - The entire OS can be saved and booted on a USB key.
Linutop 2 and 3 come pre-installed with the new OS. Try it out with this free demo download.
Existing customers can also upgrade using this USB key.
For more information about Linutop’s operating system, click here.
Linutop OS 4.0 online installation is only 79 euros.
Press Release Linutop OS 4.0
September 28th, 2010 - Posted in English, Green IT, Linutop OS, Small PC, Software | 2 Comments »
 Linutop OS 3.0 is small, secure, powerful and maintenance free:
Perfect for professional use public Internet access, digital signage in industrial environments and displays.
With ready-to-use Linux software
New Setup Menu allows a quick and simple configuration, USB key backup and lock for a specific use.
Linutop OS 3.0 is available in 4 versions:
for :
– Linutop3,
– Linutop2,
– Assus eee,
- Downloadable ISO Live CD Demo:
(More about Linutop OS 3.0 …)
 Linutop OS 3.0 Press release
October 20th, 2009 - Posted in English, Linutop, Linutop OS, Software | No Comments »
 For Internet Kiosks:
Setup Firefox or any other starting
applications. The kiosk can be locked
with a password so the initial state is always recovered at each
restart, Linutop provides a simple and ready-to-use public Internet access.
For Office desktop:
With Firefox and Open Office stored on an internal flash memory = no
alteration possible by mishap or virus.
For Display or Monitoring:
VLC media player, no moving parts and small size = a very easy and extremely
reliable solution for a web signage and narrowcasting.
It also has a serial port for industrial applications
(More…)
 Linutop3 Press release
September 3rd, 2009 - Posted in English, Linutop, Small PC, Software | 1 Comment »
Even a modest software project would be virtually impossible to manage without a so-called version control system (VCS) which allows developers to track and roll back changes as well as manage different versions of project files. In most cases, project files are just plain text files containing programming code, but a good VCS like Subversion can manage pretty much any file type, including word processing documents, spreadsheets, etc. This means that it can be used as a powerful tool for tracking document changes, but here is the rub: as a software aimed at developers, Subversion (or any VCS for that matter) can be tricky to set up and use. Fortunately, if you want to use Subversion to manage your OpenOffice.org documents, the OOoSVN extension can help you to do this in just a few simple steps. Before you can use OOoSVN, you have to install the Subversion software on your machine. On Ubuntu, it’s as easy as running the sudo apt-get install subversion command. Download then the latest release of the OOoSVN extension and install it using the Extension Manager in OpenOffice.org. Restart OpenOffice.org, and you should see the SVN menu. Read the rest of this entry »
March 18th, 2009 - Tags: extensions, openoffice.org, svn, tracking, versioning
Posted in English, Software, Tips & Tutorials | No Comments »
Just because Linutop is based on Linux, it doesn’t mean it’s difficult to configure. In fact, the little machine comes with a custom Linutop Setup applet which allows you to configure virtually every aspect of the system in a matter of minutes. By default, the applet starts automatically, but you can also launch it manually at any time by choosing Applications -> Setup -> Linutop Setup.
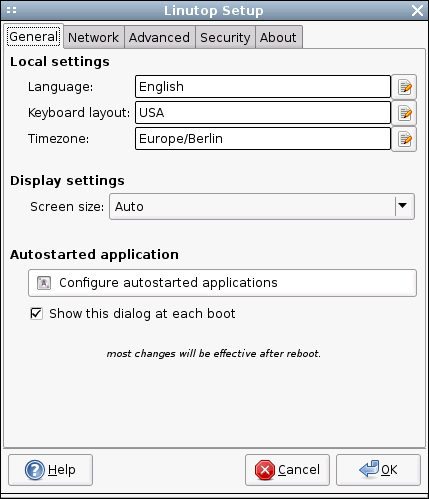 The Linutop Setup applet’s window is divided into four main sections: General, Network, Advanced, and Security. Besides the Language, Keyboard, and Time zone settings, you can use the General section to configure display settings. Usually, Linutop does a good job of detecting the correct display size and resolution. But if it has problems detecting the display’s properties correctly, you can select the appropriate item from the Display size drop-down list. The General section also allows you to configure autostart options, which can be useful in many situations. For example, you can configure Linutop to bypass the full graphical desktop environment and launch only a specified URL in the default Web browser. This can come in particularly handy if you want to use Linutop as a simple Web station. To do this, press the Configure autostarted applications button, select Web Page from the Select an item drop-down list, and tick the Start only this application check button. Tick then the Start with this URL or file check box and enter the desired URL.
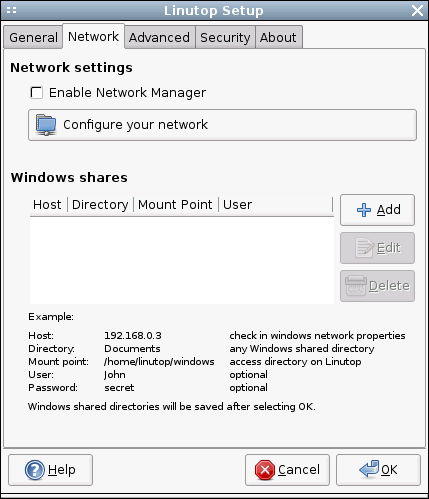 As you might have guessed, the Network section lets you configure wireless and wired interfaces as well as a modem connection. If you are using the built-in Ethernet connection, Linutop does all the donkey work for you. However, if you still need to tweak some settings (e.g., define a static IP address instead of the default DHCP option), press the Configure your network button, select Ethernet connection, and press Properties. In a similar manner, you can configure a wireless interface. Choose Wireless Connection from the list of available connections, press Properties, and fill out the required fields. If you are using Linutop in a mixed environment and you want to access documents and files stored on a Windows machine, you can use the Windows shares subsection to easily add shared folders. Simply press the Add button and type the IP address of the Windows machine in the Host field. Enter then the user name and password required for accessing the Windows share and press OK.
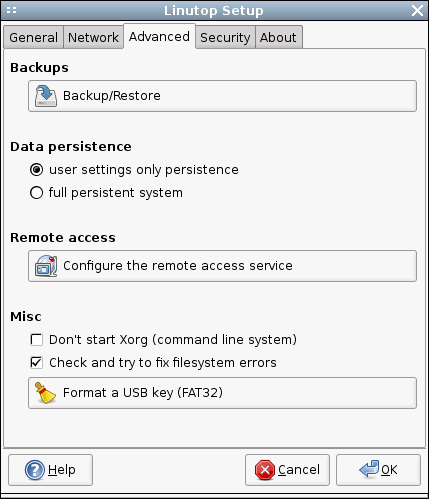 The Advanced section sports a couple of rather useful features. As the name suggests, the Backup/Restore button allows you to back up and restore the entire system in just three simple steps: press the button, select the destination drive, and press the Apply button. When you shut down Linutop it by default saves only the user settings. So if you install an application and then reboot Linutop, the system will return to its original state. This may sound like a nuisance , but this feature can be useful in situations where you don’t want other users to mess with the system. But what if you want to install additional applications? Select the full persistent system option in the Data persistence subsection, and Linutop will from now on save all your settings and applications. The Remote access subsection lets you easily enable and configure the remote access service, so you can connect to your Linutop and control it from another machine on the network or via the Internet. Press the Configure the remote access service button, and tick the Automatically start the server check box, so that the service starts automatically when you turn Linutop on. If you want to protect Linutop from unauthorized access (which is a very good idea), tick the Request a password check box and specify the desired password. To let users view the Linutop desktop but not control it, tick the Connected users can only view the desktop check box. Finally, tick the Allow multiple connections check box if you want to allow more than one user to access Linutop. Press the Start button, and you can then access Linutop remotely. You can use Linutop not only as a desktop machine, but also as a server. Install, for example, Samba software on it, plug in an external USB hard disk, and you can use Linutop as a nifty file server. In this case, Linutop doesn’t need the full graphical desktop environment, and you can disable it by ticking the Don’t start Xorg check box in the Misc subsection.
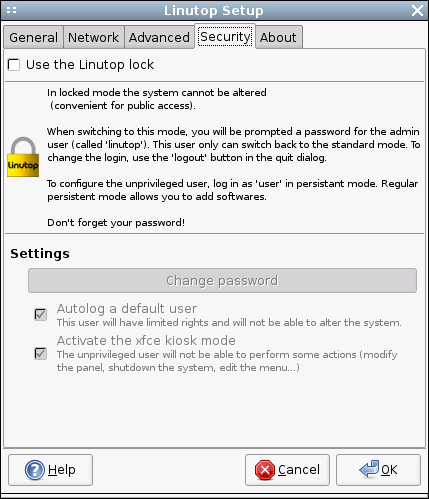
If you plan to use Linutop as a public terminal, the Security section allows you to lock the machine, so no one can modify the system (except the administrator, of course). To do this, simply tick the Use the Linutop lock check box, and specify the desired administrator password. Thanks to the Linutop Setup applet, configuring your Linutop machine is a pretty straightforward process that doesn’t require a lot of time or particular Linux skills.
March 11th, 2009 - Tags: Linutop
Posted in English, Linutop, Small PC, Software, Tips & Tutorials | 1 Comment »
Thanks to extensions you can do pretty much anything without leaving the convenience of your favorite browser. But can you play games? Indeed, you can. There are a few rather good games you can play right from within Firefox. One such game is Clines, a clone of a popular Color Lines game for DOS.
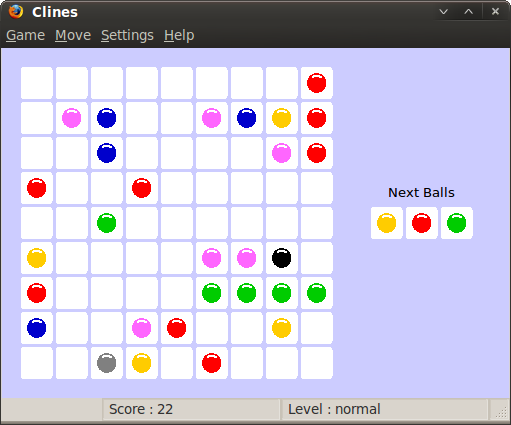
The original game was developed by Oleg Demin, and it was hugely popular in Russia along with another Russian blockbuster Tetris. The idea behind Clines is rather simple. Using the mouse, you have to align at least five balls of the same color horizontally, vertically, or diagonally on the 9×9 field. When you do that, the row disappears. Your task is to align and remove as many balls as you can. It may sound like a dead-simple thing to do, but it is not. Each time you move a ball, the game places randomly three new balls on the field, and they can block the ball you want to move. As the number of balls on the field grows, moving them around becomes more and more difficult. Every time you make a line, you receive points depending on how many balls there are in the line:
Read the rest of this entry »
March 9th, 2009 - Tags: extensions, Firefox, games, puzzles
Posted in English, Software | 3 Comments »
“Mail Merge” and “easy to use” are not the words you often see in the same sentence. While you can use the Mail Merge feature in OpenOffice.org to perform rather advanced mail merge operations, it can also be rather difficult to get to grips with and cumbersome to use. Fortunately, the FastMailMerge extension can help you to run simple mail merges with minimum effort. Once the extension is installed, it adds a separate toolbar in Calc containing the FastMailMerge button. Before you press the button, though, make sure you have your mail merge data in an OpenOffice.org Calc spreadsheet, as this is the only data source FastMailMerge can use. Open the spreadsheet containing the mail merge data, select the desired data range, and press the FastMailMerge button.
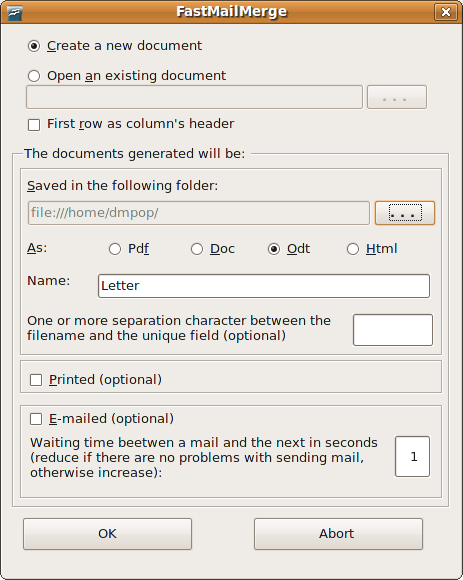
This opens the FastMailMerge dialog window where you have to configure mail merge settings. You can create a new Writer document for mail merge from scratch (the Create a new document option) or select the existing one (the Open an existing document option). You also have to specify a directory for saving merged documents and select the desired format (you can choose between PDF, Microsoft Word, ODT, or HTML). Enter then a name for the merged files, and press the OK button to perform the mail merge operation. Read the rest of this entry »
March 4th, 2009 - Tags: extensions, mail merge
Posted in English, Software, Tips & Tutorials | No Comments »
AbiWord may not be as powerful as OpenOffice.org Writer, but it does include a few nifty features that make it a worthy addition to your productivity toolbox. Take the Collaboration feature, for example. It allows several users to work on the same document on the local network or via the Web in a rather straightforward manner. First, you have to create an account. In AbiWord, choose Collaborate -> Accounts and press the Add button. Choose the desired protocol from the Account type drop-down list. If you want to share documents with users on the local network, select the Direct Connection (TCP) option. Select then the Accept incoming connections option and press OK to save the settings. Once you've created an account, choose the Share Document item from the Collaborate menu to share the currently opened document.
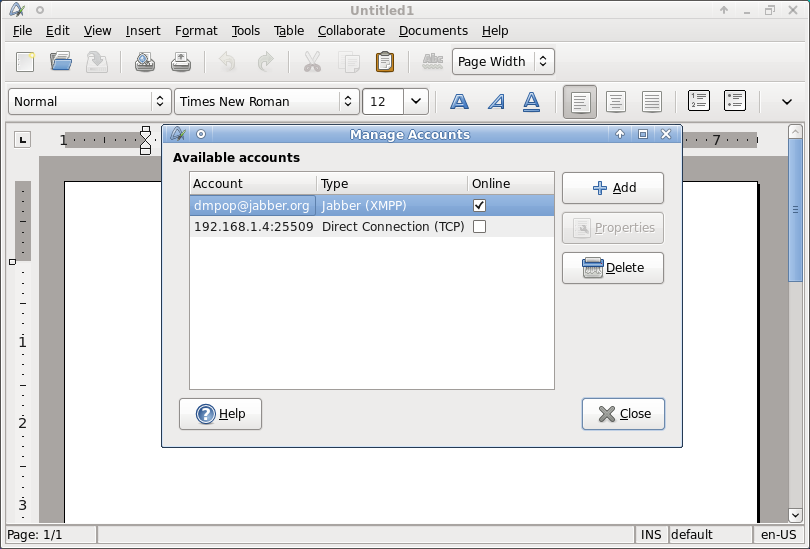
Now, let's take a look at how to access the shared document from another machine on the network. Choose Collaborate -> Accounts, press the Add button, and select the Direct Connection (TCP) option from the Account type drop-down list. Select then the Connect to a server option and enter the IP address of the machine that hosts the shared document. Press OK to save the settings. Choose then Collaborate -> Shared Documents, select the document you want from the list of shared documents, and press the Connect button. This opens the selected document and you can work with it as if it was a local document. The only difference is that you can't save your changes: this can only be done by the user who shares the document.
You can also use the direct TCP connection to share documents via the Internet, but this means that you have to configure your network to accept incoming connections -- which is probably not a very good idea from a security point of view. If you need to share a document via the Internet, a better solution is to set up a XMPP-based connection. XMPP is an instant messaging protocol, and to use it for document sharing you and the users who want to access shared documents need Jabber-based accounts. You can easily set up a Jabber account using one of the many IM applications like Pidgin, Gajim, or Kopete. To share documents via XMPP, create an XMPP account in AbiWord: choose Collaborate -> Accounts, press Add, select Jabber (XMPP) from the Account type drop-down list, and enter your user name, password, and Jabber server address in the appropriate fields in the Account properties section. Press OK to save the account, then use the Share Document command to enable sharing for the current document.
To access the document shared via XMPP, choose Collaborate -> Shared Documents, press the Add Buddy button and enter the Jabber user name of the user who hosts the document. Press OK to save the settings, select then the document you want, and press Connect.
While the Collaborate feature in AbiWord provides an easy way to share documents with other users, it does have a few limitations. For example, there is no way to track changes made by different users, and remote users cannot save changes. But even with these limitations, the Collaborate feature can come in handy if you need to share a document with other users and allow them to make changes to the document.
February 9th, 2009 - Tags: abiword, collaboration
Posted in English, Software, Tips & Tutorials | 4 Comments »
 Paris, February 3rd, 2009
Linutop is pleased to announce today Linutop 2.4 the latest version of Linutop.
Linutop OS 2.4 now includes :
- Remote management (Demo)
- It can be used as a thin client
- USB key back up
- wifi USB key network manager
as well as:
- Firefox 3.0
- Open Office 2.4
- Ubuntu 8.04 Hardy Heron.
 Press release.
February 3rd, 2009 - Posted in English, Green IT, Linutop, Small PC, Software | No Comments »
Although Ubuntu and its derivatives sport powerful command-line and graphical tools for installing software, they can be slightly confusing for Linux newcomers. Enter Appnr, a sleek and user-friendly Web-based service that allows you to easily find the applications you need and install them with a single mouse click.
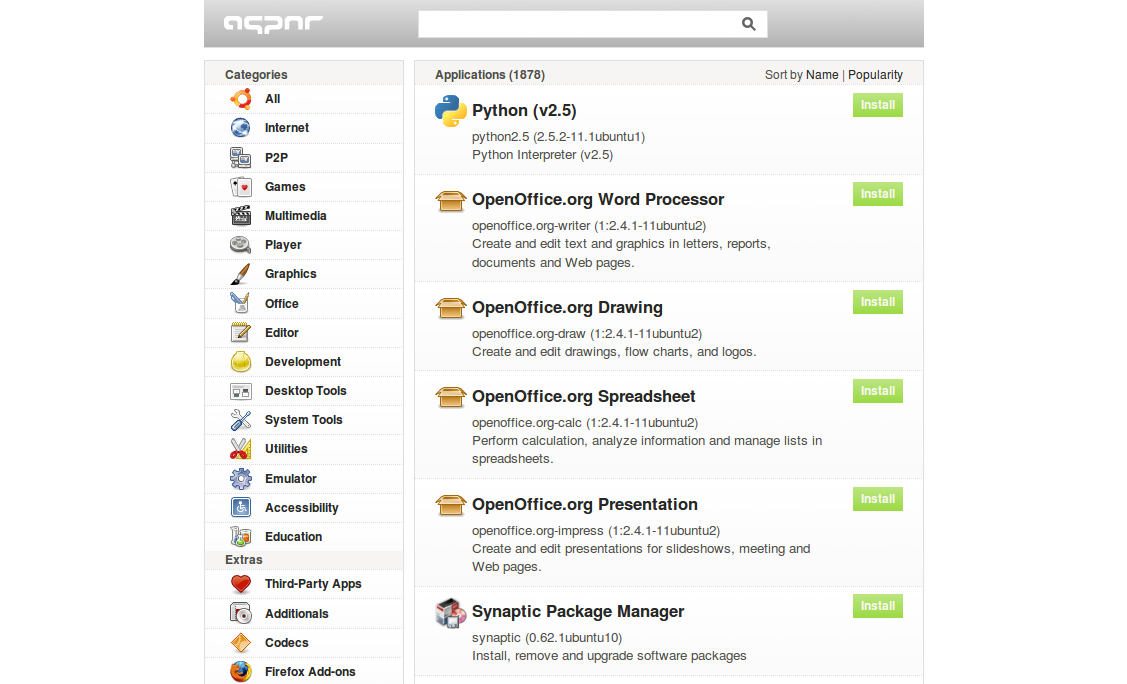
All applications and utilities listed on Appnr are organized in sections, and you can sort the list of the available software by name or by popularity. Obviously, you can also search for a specific package using the search field. While Appnr provides an easy way to find and install software, you need to tweak your Ubuntu system to make it work. First of all, install the apturl package. To do this, run the following command in the terminal:
sudo apt-get install apturl
Then you have to add the AptURL protocol in your browser. If you are using Firefox, enter about:config in the Location bar. Right-click somewhere on the page and select New –> String.
Enter network.protocol-handler.app.apt as the name of the string, press OK and enter /usr/bin/apturl as the string’s value. In a similar manner, create another string and use network.protocol-handler.app.apt+http and /usr/bin/apturl as the string’s name and value respectively. If you are using another browser, check Appnr’s help page for configuration instructions. That’s all there is to it. You can now browse and install software without leaving the convenience of your browser.
December 12th, 2008 - Tags: apt. installation, software, Ubuntu, xubuntu
Posted in English, Linux, Software, Tips & Tutorials | 1 Comment »


 The Linutop Setup applet’s window is divided into four main sections: General, Network, Advanced, and Security. Besides the Language, Keyboard, and Time zone settings, you can use the General section to configure display settings. Usually, Linutop does a good job of detecting the correct display size and resolution. But if it has problems detecting the display’s properties correctly, you can select the appropriate item from the Display size drop-down list. The General section also allows you to configure autostart options, which can be useful in many situations. For example, you can configure Linutop to bypass the full graphical desktop environment and launch only a specified URL in the default Web browser. This can come in particularly handy if you want to use Linutop as a simple Web station. To do this, press the Configure autostarted applications button, select Web Page from the Select an item drop-down list, and tick the Start only this application check button. Tick then the Start with this URL or file check box and enter the desired URL.
 As you might have guessed, the Network section lets you configure wireless and wired interfaces as well as a modem connection. If you are using the built-in Ethernet connection, Linutop does all the donkey work for you. However, if you still need to tweak some settings (e.g., define a static IP address instead of the default DHCP option), press the Configure your network button, select Ethernet connection, and press Properties. In a similar manner, you can configure a wireless interface. Choose Wireless Connection from the list of available connections, press Properties, and fill out the required fields. If you are using Linutop in a mixed environment and you want to access documents and files stored on a Windows machine, you can use the Windows shares subsection to easily add shared folders. Simply press the Add button and type the IP address of the Windows machine in the Host field. Enter then the user name and password required for accessing the Windows share and press OK.
 The Advanced section sports a couple of rather useful features. As the name suggests, the Backup/Restore button allows you to back up and restore the entire system in just three simple steps: press the button, select the destination drive, and press the Apply button. When you shut down Linutop it by default saves only the user settings. So if you install an application and then reboot Linutop, the system will return to its original state. This may sound like a nuisance , but this feature can be useful in situations where you don’t want other users to mess with the system. But what if you want to install additional applications? Select the full persistent system option in the Data persistence subsection, and Linutop will from now on save all your settings and applications. The Remote access subsection lets you easily enable and configure the remote access service, so you can connect to your Linutop and control it from another machine on the network or via the Internet. Press the Configure the remote access service button, and tick the Automatically start the server check box, so that the service starts automatically when you turn Linutop on. If you want to protect Linutop from unauthorized access (which is a very good idea), tick the Request a password check box and specify the desired password. To let users view the Linutop desktop but not control it, tick the Connected users can only view the desktop check box. Finally, tick the Allow multiple connections check box if you want to allow more than one user to access Linutop. Press the Start button, and you can then access Linutop remotely. You can use Linutop not only as a desktop machine, but also as a server. Install, for example, Samba software on it, plug in an external USB hard disk, and you can use Linutop as a nifty file server. In this case, Linutop doesn’t need the full graphical desktop environment, and you can disable it by ticking the Don’t start Xorg check box in the Misc subsection.


