February 2007 : Gauvain Pocentek
Gauvain Pocentek is one of the key person in the success of the Linutop. He is in charge of the Linutop software based on Xubuntu. The video was taken in Paris February 2007 at our first meeting.

Gauvain Pocentek is one of the key person in the success of the Linutop. He is in charge of the Linutop software based on Xubuntu. The video was taken in Paris February 2007 at our first meeting.
The Linutop project started in Tallinn (Estonia) en April 2006. Martin-Eric Racine (one the left) was in charge of the prototype of the first Linutop.

New to OpenOffice.org Writer? Want to get the most out of it? Here are five simple tips to get you started. Learn to use keyboard shortcuts Although you can access all Writer’s features via the toolbar and menus, using keyboard shortcuts can speed up your work. Writer offers a huge number of shortcuts, but you don’t have to learn them all. Note which features you use most, then find their keyboard shortcuts. The OpenOffice.org Writer Cheat Sheet created by yours truly http://nothickmanuals.info/doku.php/cheatsheets can help you with that. Install extensions Similar to Firefox, OpenOffice.org’s default functionality can be extended using extensions. Head over to the official extension repository, and grab the extensions you find useful. Don’t know which extensions to pick? The Five Useful Extensions for OpenOffice.org blog post can give you a few pointers.
Learn to use styles Styles is one of Writer’s most powerful features. Getting to grips with styles does require time and effort, but once you’ve mastered this feature, you can manage even the most complex document with consummate ease. The Using styles in OpenOffice.org article and the Introduction to Styles chapter from the OpenOffice.org User guide can help you to get started with this feature. Learn to use notes, versions, changes These three features are essential for efficient writing and collaboration, so it’s worth to spend some time on learning how to use these features. Check the online help for a brief introduction to these features. Backup OpenOffice.org profile OpenOffice.org stores all user settings in a profile folder inside your home directory (e.g., /home/user/.openoffice.org). Back up it regularly, so next time you need to reinstall OpenOffice.org or install it on another machine, you don’t have to configure it from scratch. Bonus tip The OpenOffice.org 3 Writer Guide is a must-read book if you want to get the most out of Writer.
While Linutop is not designed to run heavyweight applications, you can relegate the most demanding computer tasks to a more powerful desktop machine or server and use Linutop to run applications remotely. This solution (often called the server/thin client model) allows you not only to use demanding applications on your Linutop, but also lets you access files and documents stored on a remote machine. This means, for example, that you can easily access documents and applications on your computer at the office using Linutop at home. air max pas cher To do all that, you have to install and configure a VNC server on your desktop computer, and set up a VNC client on your Linutop. VNC is a protocol that allows you to control a remote computer as if you were sitting in front of it. And if you run a VNC session in full screen on your Linutop, it’s almost impossible to tell that you are controlling a remote machine. VNC is not the fastest system of its kind, but it is very easy to configure and straightforward in use. And if you run it on your home network, it is fast enough for most tasks. Read the rest of this entry »
Even a modest software project would be virtually impossible to manage without a so-called version control system (VCS) which allows developers to track and roll back changes as well as manage different versions of project files. In most cases, project files are just plain text files containing programming code, but a good VCS like Subversion can manage pretty much any file type, including word processing documents, spreadsheets, etc. This means that it can be used as a powerful tool for tracking document changes, but here is the rub: as a software aimed at developers, Subversion (or any VCS for that matter) can be tricky to set up and use. Fortunately, if you want to use Subversion to manage your OpenOffice.org documents, the OOoSVN extension can help you to do this in just a few simple steps. Before you can use OOoSVN, you have to install the Subversion software on your machine. On Ubuntu, it’s as easy as running the sudo apt-get install subversion command. Download then the latest release of the OOoSVN extension and install it using the Extension Manager in OpenOffice.org. Restart OpenOffice.org, and you should see the SVN menu. Read the rest of this entry »
Even the most basic routers these days offer the NAT feature and firewall capabilities which protect your machines on the local network. But there are situations when you have to connect your Linutop directly to the Internet, or bypass the router’s firewall (for example, if you want to use Linutop as a server accessible from the outside). In this case, a decent firewall tool is essential. The problem is, though, that many firewall applications are not particularly user-friendly and you really have to know what you are doing when configuring them.
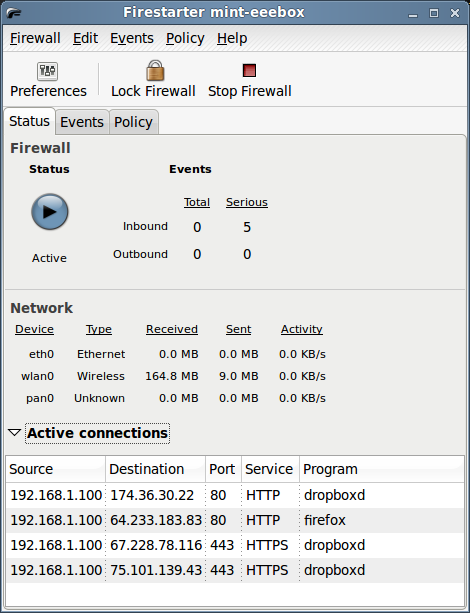
If tweaking a firewall via the command line is not your cup of tea, then you’ll appreciate Firestarter, a graphical application which significantly simplifies the process of setting up and configuring a firewall. To install Firestarter, run the sudo apt-get install firestarter command, or use the Synaptic package manager.
 Exhibition and conferences
March 31th , 1st and 2nd April 2009
Porte de Versailles,
Hall 2.2
Opening hours:
31st March 9 am to 6 pm
1st April 9 am to 8 pm
2nd April 9 am to 6 pm
Linutop Booth D1
See you there!
(Get a badge)
Just because Linutop is based on Linux, it doesn’t mean it’s difficult to configure. In fact, the little machine comes with a custom Linutop Setup applet which allows you to configure virtually every aspect of the system in a matter of minutes. By default, the applet starts automatically, but you can also launch it manually at any time by choosing Applications -> Setup -> Linutop Setup.
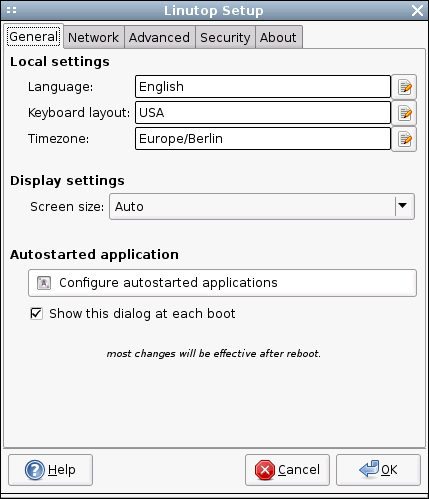 The Linutop Setup applet’s window is divided into four main sections: General, Network, Advanced, and Security. Besides the Language, Keyboard, and Time zone settings, you can use the General section to configure display settings. Usually, Linutop does a good job of detecting the correct display size and resolution. But if it has problems detecting the display’s properties correctly, you can select the appropriate item from the Display size drop-down list. The General section also allows you to configure autostart options, which can be useful in many situations. For example, you can configure Linutop to bypass the full graphical desktop environment and launch only a specified URL in the default Web browser. This can come in particularly handy if you want to use Linutop as a simple Web station. To do this, press the Configure autostarted applications button, select Web Page from the Select an item drop-down list, and tick the Start only this application check button. Tick then the Start with this URL or file check box and enter the desired URL.
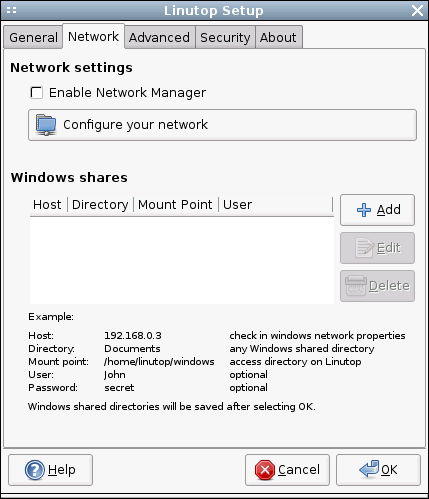 As you might have guessed, the Network section lets you configure wireless and wired interfaces as well as a modem connection. If you are using the built-in Ethernet connection, Linutop does all the donkey work for you. However, if you still need to tweak some settings (e.g., define a static IP address instead of the default DHCP option), press the Configure your network button, select Ethernet connection, and press Properties. In a similar manner, you can configure a wireless interface. Choose Wireless Connection from the list of available connections, press Properties, and fill out the required fields. If you are using Linutop in a mixed environment and you want to access documents and files stored on a Windows machine, you can use the Windows shares subsection to easily add shared folders. Simply press the Add button and type the IP address of the Windows machine in the Host field. Enter then the user name and password required for accessing the Windows share and press OK.
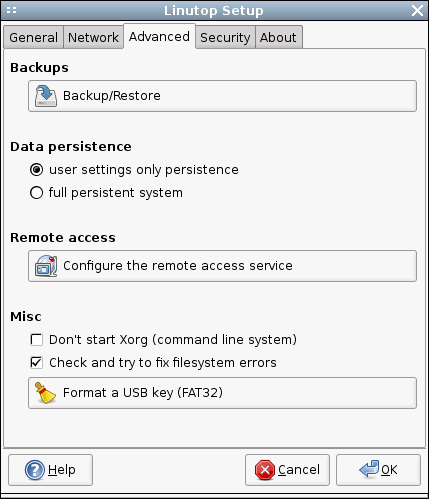 The Advanced section sports a couple of rather useful features. As the name suggests, the Backup/Restore button allows you to back up and restore the entire system in just three simple steps: press the button, select the destination drive, and press the Apply button. When you shut down Linutop it by default saves only the user settings. So if you install an application and then reboot Linutop, the system will return to its original state. This may sound like a nuisance , but this feature can be useful in situations where you don’t want other users to mess with the system. But what if you want to install additional applications? Select the full persistent system option in the Data persistence subsection, and Linutop will from now on save all your settings and applications. The Remote access subsection lets you easily enable and configure the remote access service, so you can connect to your Linutop and control it from another machine on the network or via the Internet. Press the Configure the remote access service button, and tick the Automatically start the server check box, so that the service starts automatically when you turn Linutop on. If you want to protect Linutop from unauthorized access (which is a very good idea), tick the Request a password check box and specify the desired password. To let users view the Linutop desktop but not control it, tick the Connected users can only view the desktop check box. Finally, tick the Allow multiple connections check box if you want to allow more than one user to access Linutop. Press the Start button, and you can then access Linutop remotely. You can use Linutop not only as a desktop machine, but also as a server. Install, for example, Samba software on it, plug in an external USB hard disk, and you can use Linutop as a nifty file server. In this case, Linutop doesn’t need the full graphical desktop environment, and you can disable it by ticking the Don’t start Xorg check box in the Misc subsection.

If you plan to use Linutop as a public terminal, the Security section allows you to lock the machine, so no one can modify the system (except the administrator, of course). To do this, simply tick the Use the Linutop lock check box, and specify the desired administrator password. Thanks to the Linutop Setup applet, configuring your Linutop machine is a pretty straightforward process that doesn’t require a lot of time or particular Linux skills.
Being small and silent, Linutop makes a perfect server machine. But installing all the desired server packages such as Apache, MySQL, and ProFTPD manually and then tweaking their settings requires both skills and time. There is, however, a better way to turn your Linutop into a LAMPP (Linux+Apache+MySQL+PHP+Perl) server: the XAMPP solution comes with pretty much everything you need as a single neat package. Better yet, you can install and configure XAMPP in a matter of minutes.
To install XAMPP, download the latest .tar.gz archive from the project’s Web site. Use then the following command to unpack the archive and copy all the components to the /opt directory:
sudo tar xvfz xampp-linux-1.7.tar.gz -C /opt
That’s pretty much it. You can then start all the servers using the sudo /opt/lampp/lampp start command. To make sure that everything works as it’s supposed to, point your browser to http://localhost and you should see XAMPP’s default page. Read the rest of this entry »
Thanks to extensions you can do pretty much anything without leaving the convenience of your favorite browser. But can you play games? Indeed, you can. There are a few rather good games you can play right from within Firefox. One such game is Clines, a clone of a popular Color Lines game for DOS.
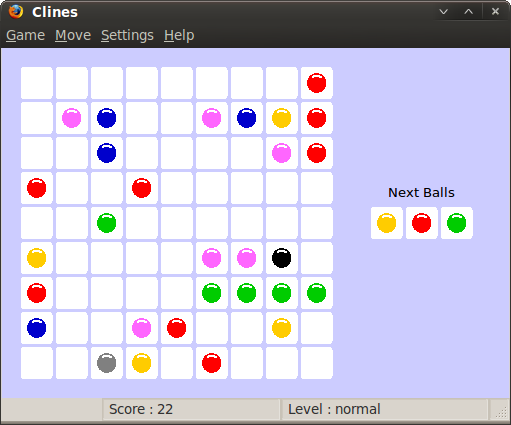
The original game was developed by Oleg Demin, and it was hugely popular in Russia along with another Russian blockbuster Tetris. The idea behind Clines is rather simple. Using the mouse, you have to align at least five balls of the same color horizontally, vertically, or diagonally on the 9×9 field. When you do that, the row disappears. Your task is to align and remove as many balls as you can. It may sound like a dead-simple thing to do, but it is not. Each time you move a ball, the game places randomly three new balls on the field, and they can block the ball you want to move. As the number of balls on the field grows, moving them around becomes more and more difficult. Every time you make a line, you receive points depending on how many balls there are in the line:
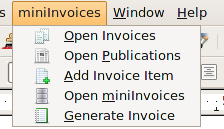
miniInvoices is a part of the Writer’s Tools package for OpenOffice.org tailored to professional writers created by yours truly. So if you write for a living, you can use miniInvoices to generate and manage invoices without leaving the convenience of your favorite productivity suite. Although miniInvoices is not the most advanced invoicing application out there, it includes a few nifty features such as the ability to manage multiple currencies and generate reports. And since miniInvoices is not overloaded with all kinds of advanced features, it’s rather straightforward in use. Better yet, since miniInvoices is a database application developed with OpenOffice.org Base, you can easily tweak it to fit your particular needs.
 Read the rest of this entry »
Flickr offers a vast collection of photos you can use with your OpenOffice.org documents, but trawling hundreds, if not thousands of photos in order to find the right one can be a rather tedious and time-consuming affair. Fortunately, the CCOOo extension can help you to find a photo you like on Flickr without leaving the convenience of your favorite productivity suite. More importantly, the extension finds only photos released under Creative Commons licenses, so you don’t have to worry about potential copyright issues.
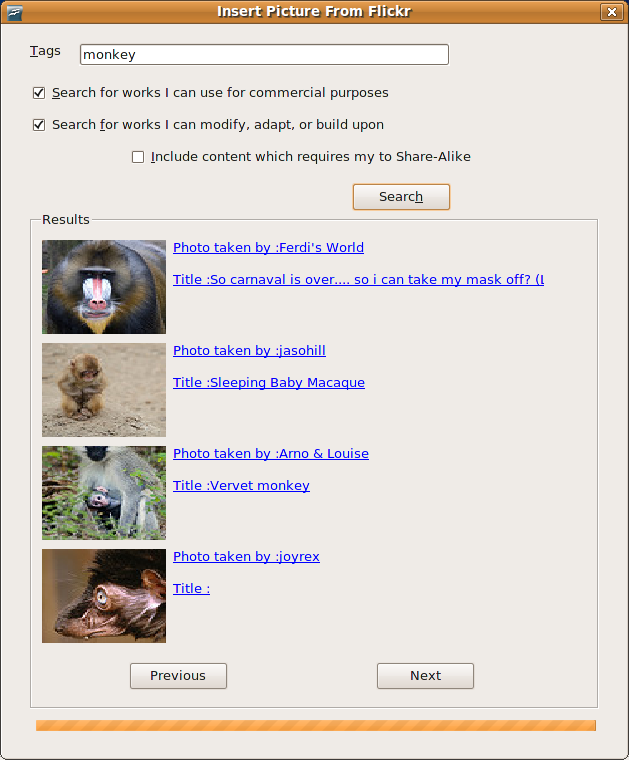 Once installed, the extension adds the Insert -> Picture -> From Flickr command which you can use to evoke the Insert Picture From Flickr dialog window. Enter the search terms you want in the Tags field. If necessary, tick the appropriate check boxes to specify additional usage requirements. Hit then the Search button to perform the search. This returns a list of photos matching the specified criteria, complete with thumbnails and hyperlinked titles and descriptions. You can use the Previous and Next buttons to browse through the list. When you’ve found the photo you like, right-click on its thumbnail to insert it in the current document and choose the desired size.
You may be forgiven for thinking that tweaking your Linux desktop requires some arcane command line skills. Any Linux distro with a graphical desktop environment provides a central place for all graphical tools which you can use to customize your desktop. Case in point: Linutop OS — the customized version of Ubuntu that powers your Linutop machine. Linutop OS uses the lightweight Xfce graphical desktop environment which you can tweak to your liking using the Xfce Settings Manager. It contains configuration applets that let you modify specific aspects of the desktop. To launch the Xfce Settings Manager, choose Settings -> Settings Manager from the Applications menu. Let’s take a look at what the Xfce Settings Manager has to offer.

Autostarted apps This applet allows you to specify applications that start automatically on boot. Adding an application to the list is easy. Click on the Autostarted apps applet and press the Add button. Provide a name and short description of the new entry in the appropriate fields, then specify the command in the Command fields. For example, if you want to start the Gwibber microblogging client (provided it’s installed on your system), enter the gwibber command. Press OK to save the entry, and you should see the created entry in the list of autostarted applications.
“Mail Merge” and “easy to use” are not the words you often see in the same sentence. While you can use the Mail Merge feature in OpenOffice.org to perform rather advanced mail merge operations, it can also be rather difficult to get to grips with and cumbersome to use. Fortunately, the FastMailMerge extension can help you to run simple mail merges with minimum effort. Once the extension is installed, it adds a separate toolbar in Calc containing the FastMailMerge button. Before you press the button, though, make sure you have your mail merge data in an OpenOffice.org Calc spreadsheet, as this is the only data source FastMailMerge can use. Open the spreadsheet containing the mail merge data, select the desired data range, and press the FastMailMerge button.
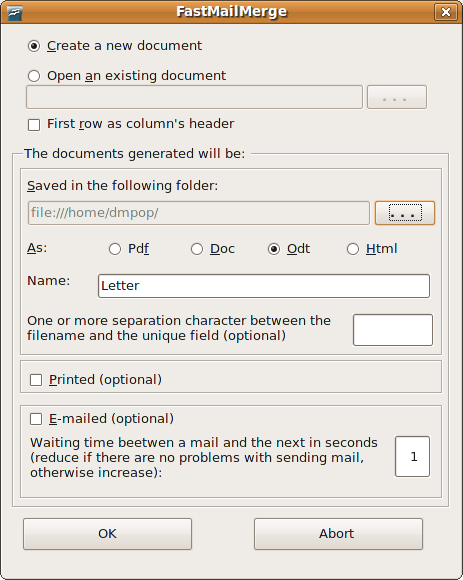
This opens the FastMailMerge dialog window where you have to configure mail merge settings. You can create a new Writer document for mail merge from scratch (the Create a new document option) or select the existing one (the Open an existing document option). You also have to specify a directory for saving merged documents and select the desired format (you can choose between PDF, Microsoft Word, ODT, or HTML). Enter then a name for the merged files, and press the OK button to perform the mail merge operation. Read the rest of this entry »
 Paris, January 1st, 2009 (Never too late)
Happy New Year
Feliz Año Nuevo
Ein Gutes Neues
Jahr
Bonne Année
Onnellista
Uutta Vuotta
ukkig Nieuwjaar
Gott nytt år
Felice anno nuovo
Godt nytår So,

Paris, March 1st, 2009
Linutop meets the specification of green computer :
Power Saving:
Linutop implements the latest computer power saving technologies.
With less than 8 watts of power consumption it is one of the most energy efficient on the market.
Sustainable development:
The Linutop life cycle is increased and its maintenance cost is reduced because no mobile parts nor weak components are used inside.
Hence the waste generated is limited.
Its small size makes it easier to recycle and its light weight (580gr) (20 oz) reduces the environmental cost of shipping.
Linutop was awarded the TIC21 price for sustainable innovation 2007
AbiWord may not be as powerful as OpenOffice.org Writer, but it does include a few nifty features that make it a worthy addition to your productivity toolbox. Take the Collaboration feature, for example. It allows several users to work on the same document on the local network or via the Web in a rather straightforward manner. First, you have to create an account. In AbiWord, choose Collaborate -> Accounts and press the Add button. Choose the desired protocol from the Account type drop-down list. If you want to share documents with users on the local network, select the Direct Connection (TCP) option. Select then the Accept incoming connections option and press OK to save the settings. Once you've created an account, choose the Share Document item from the Collaborate menu to share the currently opened document.
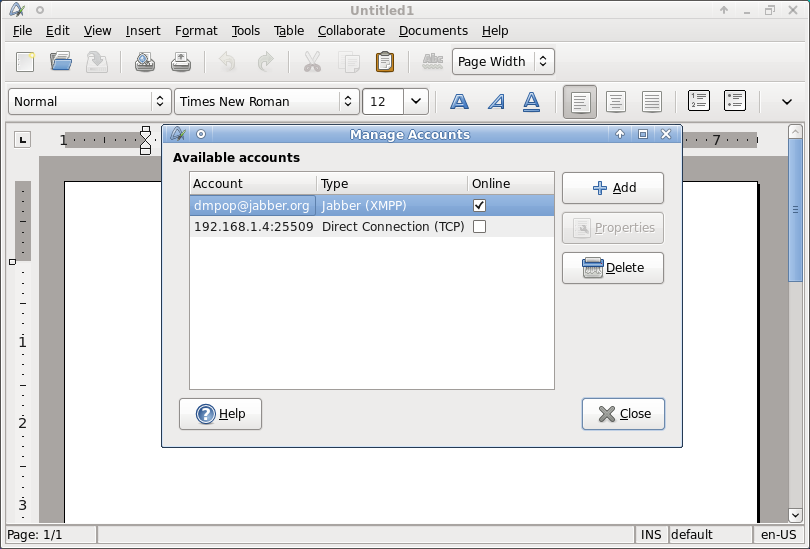
Now, let's take a look at how to access the shared document from another machine on the network. Choose Collaborate -> Accounts, press the Add button, and select the Direct Connection (TCP) option from the Account type drop-down list. Select then the Connect to a server option and enter the IP address of the machine that hosts the shared document. Press OK to save the settings. Choose then Collaborate -> Shared Documents, select the document you want from the list of shared documents, and press the Connect button. This opens the selected document and you can work with it as if it was a local document. The only difference is that you can't save your changes: this can only be done by the user who shares the document.
You can also use the direct TCP connection to share documents via the Internet, but this means that you have to configure your network to accept incoming connections -- which is probably not a very good idea from a security point of view. If you need to share a document via the Internet, a better solution is to set up a XMPP-based connection. XMPP is an instant messaging protocol, and to use it for document sharing you and the users who want to access shared documents need Jabber-based accounts. You can easily set up a Jabber account using one of the many IM applications like Pidgin, Gajim, or Kopete. To share documents via XMPP, create an XMPP account in AbiWord: choose Collaborate -> Accounts, press Add, select Jabber (XMPP) from the Account type drop-down list, and enter your user name, password, and Jabber server address in the appropriate fields in the Account properties section. Press OK to save the account, then use the Share Document command to enable sharing for the current document.
To access the document shared via XMPP, choose Collaborate -> Shared Documents, press the Add Buddy button and enter the Jabber user name of the user who hosts the document. Press OK to save the settings, select then the document you want, and press Connect.
While the Collaborate feature in AbiWord provides an easy way to share documents with other users, it does have a few limitations. For example, there is no way to track changes made by different users, and remote users cannot save changes. But even with these limitations, the Collaborate feature can come in handy if you need to share a document with other users and allow them to make changes to the document.
| Home | About us | Press | FAQ | News | Contact us | OS Documentation | Links | ©2006-2025 linutop SAS |