Turn Your Linutop into a Nifty VNC Client
While Linutop is not designed to run heavyweight applications, you can relegate the most demanding computer tasks to a more powerful desktop machine or server and use Linutop to run applications remotely. This solution (often called the server/thin client model) allows you not only to use demanding applications on your Linutop, but also lets you access files and documents stored on a remote machine. This means, for example, that you can easily access documents and applications on your computer at the office using Linutop at home. air max pas cher To do all that, you have to install and configure a VNC server on your desktop computer, and set up a VNC client on your Linutop. VNC is a protocol that allows you to control a remote computer as if you were sitting in front of it. And if you run a VNC session in full screen on your Linutop, it’s almost impossible to tell that you are controlling a remote machine. VNC is not the fastest system of its kind, but it is very easy to configure and straightforward in use. And if you run it on your home network, it is fast enough for most tasks. If you are running Ubuntu or Kubuntu on your desktop machine, turning it into a VNC server is as easy as it gets, and you have several options to choose from. On Ubuntu, the quickest solution is to use the built-in remote desktop feature. Simply choose System -> Preferences -> Remote Desktop, tick the “Allow other users to view your desktop” and “Allow other users to control your desktop” check boxes. In the Security section, tick the “Require the user to enter this password” check box and enter the desired password in the Password field. That’s it: close the window and your server is ready to go. A better approach is to use a dedicated VNC server software like TightVNC, one of the most popular and feature-rich VNC implementations out there. TightVNC is available in Ubuntu repositories, so you can easily install it using the Synaptic package manager. To locate the TightVNC package in Synaptic, click on the Search icon, enter “vnc” in the search field and press OK. In the list of found packages, select tightvncserver, right-click on it, and select Mark for Installation. Click on the Apply button to install the package. fjallraven kanken rucksack Alternatively, you can install the TightVNC software from the command line using the following command:
sudo apt-get install tightvncserver
Once TightVNC is installed, launch The Terminal program (Applications -> Accessories -> Terminal) and run the vncserver command. You will then be prompted to enter access and view-only passwords. Once you’ve done that, you should see a line that looks something like this:
New 'X' desktop is localhost:1
This indicates that the TightVNC server is up and running with display number 1. Unlike GNOME’s built-in Remote Desktop feature, TightVNC allows you to specify several important options such as display dimensions and color depth. Why is this important? Let’s say the display on your desktop machine has a 1440×900 resolution while your Linutop uses a 1024×768 display. If you run the TightVNC server using the default settings, you end up with a display image that doesn’t fit Linutop’s screen. To prevent this from happening, you can set the TightVNC server to run in 1024×768 mode using the -geometry option:
vncsever -geometry 1024x768
The same goes for color depth. If you want to speed things up a bit, you can set the TightVNC server to run in 16-bit color mode using the -depth option:
vncserver -depth 16
Of course, you can combine both options:
vncserver -geometry 1024x768 -depth 16
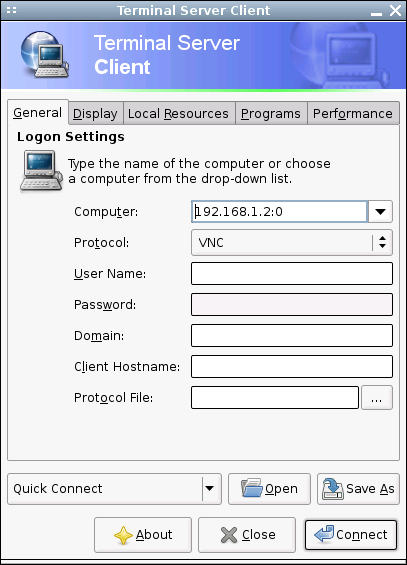
Now that the VNC server is up and running on your desktop machine, you can set up your Linutop as a VNC client. This is the easiest part, as Linutop comes with a utility called Terminal Server Client which allows you to establish a VNC connection.  All you have to do is to launch the Terminal Server Client by choosing it from the System -> Network menu. In the Computer field, enter the address of the machine running the VNC server and the display number, for example:
192.168.1.7:0
Select VNC from the Protocol field and press the Connect button. Type the password you specified when setting up the VNC server, and you should see your remote machine’s desktop. If you are using Linutop to connect to a VNC server on your local network, then you are pretty much done. But in case the remote machine is located outside your local network, then there is one more thing you have to take care of. VNC is not a secure protocol, so it is not a good idea to use it as it is to connect to a remote machine over the Internet. The solution to this problem is simple: you have to create a so-called SSH tunnel which acts as a secure channel for your VNC connection. Start with installing the openssh package on the remote machine running the VNC server. On your Linutop, run the following command in the terminal:
ssh -L 5901:localhost:5900 user@192.168.1.7
Replace localhost with the actual hostname of the machine running the VNC server and user with the existing user on the same machine. That’s it. Now launch the Terminal Server Client utility and enter the localhost:5901 address in the computer field.


